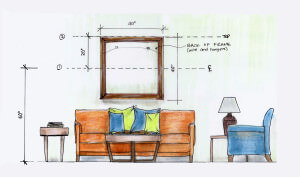
One of the many tips in my eBook “Your Room in the Nude,” is to hang your artwork with the center line 60” from the floor. Guess what the most common question is – “What the heck does that mean?” And I think to myself, well it seems pretty simple. Then I go to hang a framed gallery in a conference room and I realized, it ain’t that simple. So here is the scoop on how to hang your artwork.
Now don’t give up as you go through the steps. It may seem complicated, but once you get the “hang of it” (ha, I made a pun!) it is simple and your wall will look pleasing and perfect. You may be tempted to “eyeball it,” but believe me, the extra few steps are well worth it.
How to Hang a Picture that is Pleasing to the Eye
First : Draw a line on your wall 60” from the floor. I was hanging a collage of frames so I literally measured 60” from the floor, grabbed my trusty level (it is pink and I got it at the Dollar Store) and pencil and drew a line across the wall. At this moment you might be regressing to your childhood and recalling your mother screaming at you not to write on the walls, but no worries, with the technology of today’s paint the pencil line will wipe off.
Tip – Use a Mr. Clean Magic Eraser – works beautifully to clean walls.
Next: Find the center line of your picture. Measure the frame vertically and divide that number in half. So for example if you are hanging a large piece of artwork that is 40” tall, then 20” is your number. Measure 20” up from the line you drew on the wall and draw another line. This will be the top of your artwork.
Then: Nail in your picture hangers. Now here comes the tricky part – where to nail the hangers? We need to figure out the next measurement! Hook your measuring tape onto the wire and pull the wire taut (What? You don’t have a wire, but have a crossbar? Remove it and put a wire on the back of your frame. It will hang better and be more secure). Using the measurement from the wire to the top of the frame, draw a line down from your line in step two. This is where you nail in your hanger.
Tip – And speaking of hangers, I really like the hangers from OOK. They come in various sizes to accommodate several weights and the nails don’t make big holes. You can find them at any hardware store.
Trick – Use two hangers. Say what? Yes, instead of pulling your wire taut in the center, measure your frame horizontally and divide the number by 4 and measure in this distance from the edges of your frame. If you artwork is 40” wide then you would measure in 10” from each side, pull the wire taut with your tape measure and get the horizontal measurement for the two hangers. To get the vertical measurement, in the above example you would want your hangers spaced 20” apart.
Finally: Level your picture. Put your level on the top of the picture and adjust it until the bubble is in the center line. Lucky you, because you used two hangers, your picture will be less likely to become crooked.
If you want other design tips, be sure to download my eBook, “Your Room in the Nude”


Robert Jennison
| 26 October 2013Great stuff